


When it comes to installing electrical outlets in Collinsville, OK, safety should always come first. You must understand local and National Electrical codes to avoid potential hazards. It’s essential to choose the right outlet type and gather the necessary tools before you start. But there’s more to the process than just following steps—knowing common pitfalls can make a significant difference in your installation experience. Let’s explore what you should keep in mind.
Understand Local Electrical Codes
Understanding local electrical codes is essential when installing electrical outlets to guarantee safety and compliance. These codes dictate how and where outlets can be installed, ensuring they’re safe for your home or business.
Start by checking with your local building department or their website for specific regulations that apply to your area. Ensure you know any requirements regarding outlet placement, grounding, and circuit limitations.
You should also familiarize yourself with the National Electrical Code (NEC), which serves as a standard for electrical installations across the U.S. Adhering to these guidelines not only keeps you safe but also helps prevent future issues, like electrical fires. Furthermore, hiring certified electricians ensures precision in every service performed, enhancing overall safety.
If you’re unsure about any regulations, consider consulting a licensed electrician. They can provide expert guidance, ensuring your installation meets all safety standards and legal requirements.
Prioritizing compliance will give you peace of mind for years to come.
Choose the Right Outlet Type
Choosing the right outlet type is vital for guaranteeing your electrical system meets your needs safely and efficiently. Start by evaluating the appliances and devices you’ll plug in. For standard household items, a 15-amp, 120-volt outlet is usually sufficient.
However, consider a 20-amp outlet to handle the increased load if you’re using heavy-duty equipment.
You should also think about the outlet’s location. If it’s in a damp area like a bathroom or kitchen, GFCI outlets are a must to prevent electric shock.
For outdoor use, weatherproof outlets are essential for protection against the elements.
Finally, if you need USB charging, look for outlets that include USB ports for added convenience. Additionally, professional installation is recommended for safety and code compliance to ensure your outlets function properly.
Gather Necessary Tools and Materials
Before you start your electrical outlet installation, it’s vital to gather the right tools and materials.
You’ll need an essential tools checklist, some required safety gear, and quality materials to guarantee a successful job. Having everything ready will make the process smoother and safer. Additionally, ensure that you have the necessary knowledge about electrical outlet installation to avoid any potential hazards.
Essential Tools Checklist
The right tools are essential for a successful electrical outlet installation.
Start by gathering a voltage tester to guarantee safety when working with live wires. You’ll also need a screwdriver set, including both flathead and Phillips heads, to remove and secure outlet covers.
A wire stripper will help you prepare your wires for connection, while a drill may be necessary for creating mounting holes.
Don’t forget a pair of pliers for bending and twisting wires as needed.
Finally, have electrical tape on hand to secure connections and provide insulation.
With this essential tools checklist, you’ll be well-prepared to tackle your electrical outlet project efficiently and safely.
Required Safety Gear
While you’ve gathered your tools for the electrical outlet installation, don’t overlook the importance of safety gear. Protecting yourself is essential when working with electricity.
Here’s what you need to have on hand:
- Safety Goggles: Shield your eyes from debris and sparks while you work.
- Rubber Gloves: Insulated gloves keep you safe from electrical shocks and provide a better grip on tools.
- Hard Hat: If you’re working in a space where things could fall, a hard hat can help protect your head from injury.
Quality Materials Selection
When you’re gearing up for electrical outlet installation, selecting quality materials is crucial to guarantee both safety and functionality.
Start with the outlets themselves; look for ones that have tamper-resistant features to prevent accidental shocks.
Don’t skimp on wiring—use appropriate gauge wire that can handle the electrical load.
Verify you have a reliable electrical box, as this will support the outlet and protect it from damage.
Gather screws and connectors that meet industry standards, as these will ensure a secure installation.
Finally, invest in a good multimeter to test your work.
Turn Off Power at the Breaker Box
Before you start installing your electrical outlet, you need to turn off the power at the breaker box.
Locate the breaker box and identify the circuit that controls the outlet you’ll be working on.
Once you’ve switched it off, double-check that the power is off to confirm your safety while you work. Additionally, ensure you are aware of the signs for replacement in case you encounter any issues with the existing outlet during your installation.
Locate the Breaker Box
To guarantee your safety during the electrical outlet installation, start by locating the breaker box and turning off the power. This is essential to prevent any accidents while you work.
Here’s how to find it:
- Look in Common Areas: Check the basement, garage, or utility room where electrical components are often housed.
- Identify the Panel: The breaker box is usually a metal box with a door, containing switches or circuit breakers.
- Check for Labels: If it’s labeled, you’ll quickly spot the circuits controlling specific areas of your home.
Once you find the breaker box, flip the appropriate switch to turn off the power before proceeding. This simple step can help guarantee a safer installation experience.
Confirm Power Is off
Confirming that the power is off at the breaker box is essential for your safety during electrical outlet installation.
Start by locating the correct breaker that powers the outlet you’ll be working on. Once you’ve identified it, flip the switch to the “off” position.
It’s a good idea to double-check that the power is indeed off using a voltage tester. Simply touch the tester to the outlet; if it lights up, the power is still on. If it doesn’t, you’re good to go.
Remember, never assume the power is off without checking. Taking these precautions helps prevent electrical shocks and guarantees a safe working environment while you install your new outlet.
Safety should always come first!
Use a Voltage Tester for Safety
Using a voltage tester is essential for ensuring safety during electrical outlet installations. This handy tool helps you confirm that the power is truly off before you start working.
Here’s how to effectively use a voltage tester:
- Choose the Right Tester: Pick a tester suitable for your needs—either a non-contact or contact voltage tester.
- Test the Outlet: Before touching any wires, test the outlet by placing the tester’s probe in the slots. If it lights up, the power is still on.
- Double-Check: Always test again after flipping the circuit breaker. Don’t assume that just because you turned it off, it’s safe.
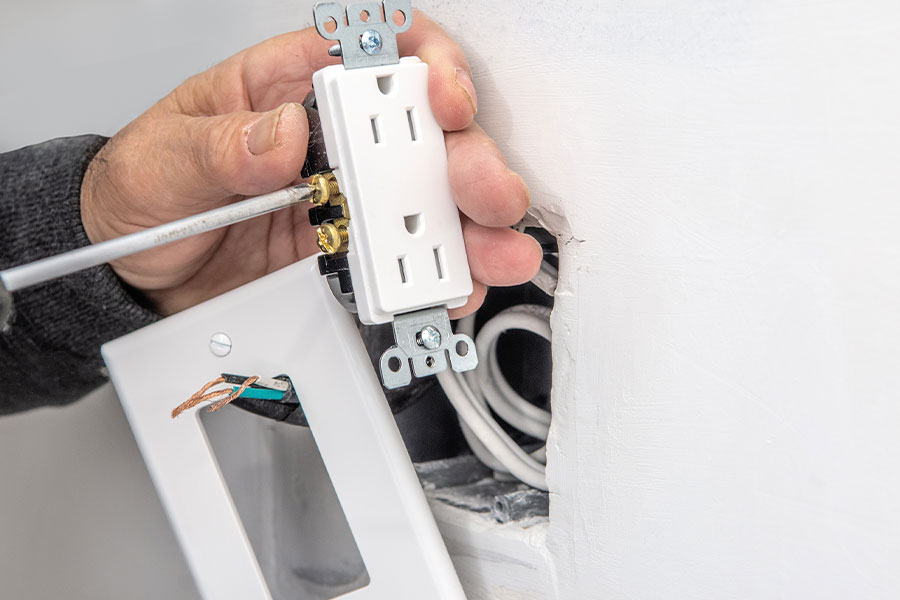
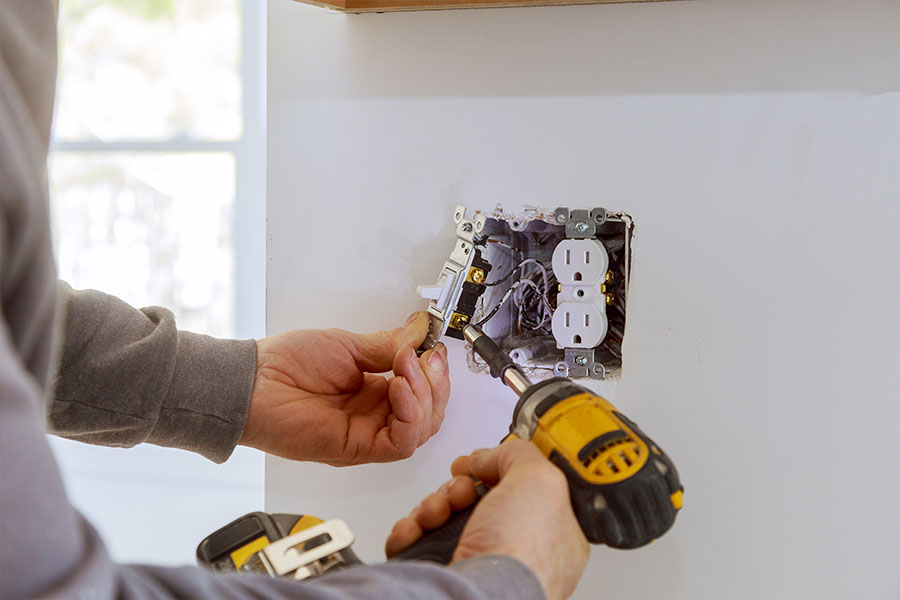
Properly Secure Outlets in the Wall
Once you’ve confirmed the power is off, it’s crucial to properly secure the outlet in the wall to prevent any future issues.
Start by positioning the outlet box in the wall cavity. Make sure it’s flush with the wall’s surface. Use screws to attach the outlet securely to the box, guaranteeing it doesn’t wobble.
Once the outlet is attached, push any excess wire back into the box carefully to avoid pinching.
Next, use the cover plate to finish the installation, which adds another layer of stability. Tighten the screws on the cover plate, but don’t overdo it; you want it snug, not overly tight. This guarantees that the outlet remains firmly in place and maintains a clean look.
Finally, do a quick visual inspection to make sure everything looks right before restoring power. Following these steps keeps your installation safe and functional.
Ensure Correct Wiring Connections
As you prepare to connect the wiring for your electrical outlet, it’s vital to verify that each wire is attached correctly to avoid hazards and confirm functionality.
Follow these essential steps to guarantee proper connections:
- Identify the Wires: Familiarize yourself with the hot (usually black), neutral (white), and ground (green or bare) wires. Knowing their purposes is key to safe installation.
- Connect Securely: Strip the insulation from the wire ends, then loop and tighten them around the terminal screws. Make sure the connections are firm to prevent any loose contacts.
- Double-Check Connections: Before sealing everything up, inspect all connections for correctness. This final check can save you from potential electrical issues down the line.
Install GFCI Outlets in Wet Areas
When working in areas prone to moisture, such as kitchens and bathrooms, it’s vital to install GFCI (Ground Fault Circuit Interrupter) outlets to enhance safety.
These outlets protect you from electrical shocks by shutting off power when they detect a ground fault, preventing potential hazards.
To install GFCI outlets, first, turn off the power at the circuit breaker. Remove the existing outlet and connect the GFCI according to the manufacturer’s instructions.
Be certain to connect the line wires to the correct terminals and secure the outlet in the box. Once installed, it’s important to position the GFCI outlet at least 12 inches above the floor to reduce the risk of water exposure.
For added safety, consider labeling the GFCI outlet to remind others that it’s designed for wet areas.
Test the Outlet After Installation
Once you’ve installed your new outlet, it’s essential to test it for safety and functionality.
You can use a multimeter to check the voltage and guarantee proper grounding, so you know everything’s working as it should.
Don’t skip this step; a quick inspection can prevent future electrical issues.
Use a Multimeter
Testing your newly installed electrical outlet with a multimeter is an essential step to guarantee everything’s functioning safely and correctly.
Here’s how to do it effectively:
- Set the Multimeter: Turn your multimeter to the AC voltage setting, ensuring it’s capable of reading at least 120 volts.
- Insert Probes: Carefully insert the black probe into the larger slot (neutral) and the red probe into the smaller slot (hot) of the outlet.
- Read the Measurement: Check the display for a voltage reading between 110 and 120 volts. If it’s outside this range, you might’ve an issue.
Using a multimeter helps you confirm that your installation is safe and ready for use.
Don’t skip this vital step!
Check for Grounding
After verifying your electrical outlet is functioning correctly with the multimeter, the next step is to check for proper grounding. A grounded outlet protects you from electrical shocks and guarantees your appliances work safely.
To test for grounding, plug in a three-prong tester that indicates grounding status. If the light shows a proper connection, you’re good to go. If not, turn off the power and inspect the wiring.
Make certain the ground wire is securely connected to the outlet and the electrical box. If you’re unsure about any part of this process, it’s best to call a professional.
Inspect Outlet Functionality
Before you plug in your appliances, it’s crucial to verify your newly installed outlet is functioning properly.
Testing your outlet guarantees safety and prevents potential hazards. Here’s what you should do:
- Use a Voltage Tester: Check the outlet with a voltage tester to confirm it’s receiving power.
- Test with a Device: Plug in a simple device, like a lamp, to see if it turns on, confirming the outlet is operational.
- Check for Overheating: Monitor the outlet for any signs of overheating, which could indicate a problem.
Schedule Professional Inspections When Needed
When you notice signs of electrical issues, like flickering lights or tripped breakers, it’s crucial to schedule professional inspections promptly. Ignoring these problems can lead to more severe hazards, including electrical fires or costly repairs.
A trained electrician can accurately diagnose the issue and guarantee your outlets are safe and functional.
Don’t wait until a minor problem escalates into a significant concern. Regular inspections also help identify potential risks, allowing you to address them before they become critical.
If you’re planning to install new outlets or upgrade existing ones, having a professional assess your electrical system is invaluable.
Working with a trusted company like Air Solutions Heating, Cooling, Plumbing & Electrical guarantees you receive honest assessments and quality workmanship.
Conclusion
By following these tips, you can guarantee a safe and efficient electrical outlet installation in Collinsville, OK. Did you know that nearly 51,000 electrical fires occur in homes each year, often due to improper installations? Taking the time to understand local codes, using the right tools, and considering GFCI outlets can greatly reduce your risk. Remember, if you’re ever unsure, it’s always best to consult a licensed electrician for peace of mind and expert assistance.